2018-10-30

October 2018 monthly sales release.(Apple App store sticker app)

October 2018 monthly sales release.
Except for the 5 most recently added sticker apps, there are 15 sticker apps that are registered in the app store during October.
Six of them were sold. The other nine were rarely sold. They are not popular.


The country with the highest sales is the United States.
The second is Europe, with the smallest sales volume in Asia.

Until recently, it was slow because I made it by myself. Also, image files were always downloaded and used.
Now the wife draws a simple emoticon. I finish it with a computer.
So we expect to see more and more revenue.

2018-10-29

Step 5: Create and upload sticker app with Xcode.

Have you registered a bundle ID?
Is the image file of the sticker and icon ready?
If so, you can now create and upload a sticker app using Xcode.


1. Run Xcode and click "Create a new Xcode project".


2. On the IOS tab, select "Sticker pack app" in "Application".


3. Enter the sticker app name and bundle ID registered on the Apple developer site.
- If you enter "product name" and "Organizatiom identifier", you can see that the bundle ID is automatically generated.
- The automatically created bundle ID must be the same as the bundle ID registered at the developer site.


4. Select the location to save and click "Create".

5. Do not edit any other settings, but select "Stickers.xcstickers" in the left tab.


6. On the second tab, select the "Sticker Pack" folder and drag and drop your sticker image file at once.


7. Click "iMessage App icon" on the "Sticker Pack" folder, and drag and drop the downloaded icon image files one by one to the size.

8. Change the top device to "Generic IOS Device" instead of "iPhone". Next, select "Product" from the menu and select "Archive".


9. Click "Upload to App Store" in the right tab to upload.


10. The next step is to end the upload.

2018-10-26

Step 2: Create a image file to use as a icon for Apple App store.

To register an app in the Apple App Store, you need to create icon files of various sizes.
You can resize the icons you created one by one, but we will use a simple icon creation site.


1. Visit the site and click "Choose file" to select the icon file you created.


2. Write your e-mail address in the space provided for entering the e-mail address. The operating system selects "IOS".


3. When you open a file arriving by e-mail, four folders are included. You only need the above two folders out of 4.

4. The folder contains icon files of all sizes needed to create a sticker app using Xcode.

2018-10-25

Step 1: Create a image file to use as a sticker app.

Create a image file to use as a sticker app.
The sticker you want to make should be prepared as an image file.
The best way is to draw what you want with Photoshop.
But if you do not have the skill of painting like me, you can download it from the internet and use it.
However, doing so may result in copyright infringement.
So the image file you use should be commercially available.
(You can find it on a site similar to "https://pixabay.com." That's how I created the sticker app I created.)
Recently, my wife scanned hand-drawn images and used them.
If you do not have the ability to draw pictures on your computer or you do not have the equipment, this is a good way.
The picture below is what has been made recently.

Prepare various image files in your own way.

See previous post.
lets-make-stickers-and-icons-as-image.
https://www.smart4edu.com/2018/10/lets-make-stickers-and-icons-as-image.html

2018-10-23

Step 3: Create a sticky app in earnest(Creating a Bundle ID)

Step 1: Create a sticky app in earnest(Creating a Bundle ID)
When you create an app in Xcode, you must enter the bundle ID in the configuration.
The bundle ID should be created in the Apple Developer Account site, not in Xcode.
I will create a bundle ID from now on.


1. Log in to the Apple developer site.

2. Click "Certificates, Identifiers & Profiles".


3. Click App ID and then click "+".


 4. Enter the name of the app you want to use.

5. Enter the bundle ID according to the rule.
"Write the site name backwards." + "Write the app name in lowercase, without spaces." + "Write the name of the app you typed above as it is.(replacing the blank with" - ")"
*This bundle ID should be exactly the same in Xcode when you create your app.


6. Click on the remaining steps to finish.

7. Click "All" in "Provisioning Profiles" to create a profile. Next, click "+".


 8. Check the "App Store" of the distribution and click "Continue".

9. Select the bundle ID you created in the previous step and proceed to the next step.


10. Select Distribution and proceed to the next step.


11. Enter the profile name as you want and proceed to the next step.


12. You can see that the profile is created normally.


Salts and salts of sea water - a lecture video for a "flipped classroom".

Salts and salts of sea water - a lecture video for a "flipped classroom".
Made by "Explain everything" app.


Formation and use of glaciers - a lecture video for a "flipped classroom".

Formation and use of glaciers - a lecture video for a "flipped classroom".
Made by "Explain everything" app.


Use of the Water and Earth's Water - a lecture video for a "flipped classroom".

Use of the Water and Earth's Water - a lecture video for a "flipped classroom".
Made by "Explain everything" app.


The state of matter and molecular motion - a lecture video for a "flipped classroom"

The state of matter and molecular motion - a lecture video for a "flipped classroom"
Made by "Explain everything" app.


Vaporization and liquefaction - a lecture video for a "flipped classroom"

Vaporization and liquefaction - a lecture video for a "flipped classroom"
Made by "Explain everything" app.


Molecular Diffusion by State Change - a lecture video for a "flipped classroom"Made by

Molecular Diffusion by State Change - a lecture video for a "flipped classroom"Made by "Explain everything" app.


Sublimation - a lecture video for a "flipped classroom"

Sublimation - a lecture video for a "flipped classroom"
Made by "Explain everything" app.


Fusion and clotting - a lecture video for a "flipped classroom"

Fusion and clotting - a lecture video for a "flipped classroom"
Made by "Explain everything" app.


Useful tools for smart classrooms. POWTOON!

With POWTOON, you can create simple animations for your lessons.
It is more dynamic and fun to present than PowerPoint.
Attach a simple animation I made.
I will not explain how to use it here.
I hope you get used to it yourself.


2018-10-22

Let's start with the Apple Developer Program first.

If you've got all the ingredients you need to make a sticker app, let's get started.
Let's start with the Apple Developer Program first.

Getting Started
If you’re new to development on Apple Platforms, you can get started with our tools and resources for free. If you’re ready to build more advanced capabilities and distribute your apps on the App Store, enroll in the Apple Developer Program.
The cost is 99 USD per membership year.

Go to: https://developer.apple.com/enroll/


If you are an individual or sole proprietor/single person business, get started by signing in with your Apple ID with two-factor authentication turned on. You’ll need to provide basic personal information, including your legal name and address.

Two-factor authentication is an extra layer of security for your Apple ID designed to ensure that you're the only person who can access your account, even if someone knows your password.

Set up two-factor authentication for your Apple ID
Two-factor authentication is available to iCloud and iTunes users with at least one device that's using the latest iOS or macOS. Learn more.


You can follow these steps on your iPhone, iPad, or iPod touch to turn on two-factor authentication.

If you're using iOS 10.3 or later:
Go to Settings > [your name] > Password & Security.
Tap Turn On Two-Factor Authentication.
Tap Continue.

If you're using iOS 10.2 or earlier:
Go to Settings > iCloud.
Tap your Apple ID > Password & Security.
Tap Turn On Two-Factor Authentication.
Tap Continue.

Enter and verify your trusted phone number
Enter the phone number where you want to receive verification codes when you sign in. You can choose to receive the codes by text message or automated phone call.

When you tap Next, Apple sends a verification code to the phone number you provided.

Enter the verification code to verify your phone number and turn on two-factor authentication.


Read the Apple Developer Agreement then check the ‘By Checking this box I confirm that I have read and agree.’ box and click the ‘Submit’ button.

Confirm that your email address, name, and Country location is correct, then select one of the options from the Entity Type dropdown. The Developer name listed on the iTunes App Store is based on the type of account selected from the options below. Apps published to Individual Developer Accounts will display the name listed on the iOS Developer Account.

Individual/Sole Proprietor/Single Person Business: Individuals or companies without an officially recognized business (company without a Dun and Bradstreet number). This account only allows for a single primary login to be created to the iOS Developer Account.

Fill in the all Information for your iOS Developer Account.

Apple will send a confirmation email within 24 hours notifying you that your iOS Developer Account was successfully created!


2018-10-18

Useful apps in the classroom. For Secret ballot, survey, instant test.

Today I will introduce some useful apps in the classroom.
There are times when you need to examine the opinions of each student during class.
It's possible to simply raise your hand, but if students do not know the opinions of other students, you can not use the hand raising method.
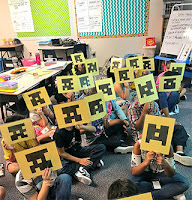
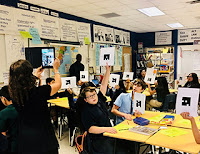
The QR code allows you to confidentially investigate the opinions of your students and easily obtain statistics using cards that are meaningless to the eye.
It is possible with an app called "PLICKERS".
First, I will show you a brief introduction video.


Getting Started Guide


2018-10-16

Let's make stickers and icons as image file.

The following is a description of the sticker on Apple's official developer site.

Stickers

Stickers offer a fun, engaging way for people to express themselves in a Messages conversation without typing or using emojis. A sticker is an image or an animation that can be sent or placed on messages, photos, and other stickers to add emphasis and communicate emotion.
Design for expressiveness. People use stickers to visually convey moods and reactions. Strive to deliver stickers that connect with people at an emotional level. Consider incorporating imagery, words, and phrases to add new dimensions to conversations.
Think globally. Messaging is a universal form of communication. Aim for stickers that have broad, international appeal.
Use descriptive image names or provide alternative text labels. Although they aren’t visible onscreen, image names and alternative text labels let VoiceOver audibly describe stickers, making navigation easier for people with visual impairments.
Add vitality through animation. Although stickers can be static images, animated stickers are a great way to impart energy in a conversation. Be sure to use a frame rate high enough to keep motion fluid.
Test placement possibilities. Users can scale, rotate, and place stickers over parts of a conversation. Make sure your stickers are legible against different colors and imagery, regardless of their position or size.
Consider using vibrant colors and transparency. Vivid colors add richness and excitement to a conversation. Transparency allows meaningful placement of stickers onto messages, photos and other stickers.

Sticker Sizes

Messages supports three sticker sizes, which are displayed in a grid-based browser. Pick a size that works best for your content and prepare all of your stickers at that size.

Sticker Formats

Messages supports stickers in the following file formats:

iMessage App and Sticker Pack Icons

Like iOS apps, iMessage apps and sticker packs need recognizable app icons.
Keep the background simple and provide a single focus point. Design an icon with a single, centered point that captures attention at a glance. Include a simple background that doesn’t overpower other icons.
Keep icon corners square. The system applies a mask that rounds icon corners automatically.
Provide different sized icons. Your icon appears in the App Store, Messages, notifications, and Settings.
Please use the above information, make the stickers and icon as image file.
But do not worry about the size of the icons, just make one. We will use a site that automatically creates icons of all sizes.

2018-10-15

Let's set Xcode for make a sticker app.

This is the first screen that appears when you select the sticker app in your project.

-Product Name: Name of the project. This value will be used as the app name if you do not set it separately after creating the project.

-Organization Name: Used to generate copyright text that is automatically added to the top of the source code.

-Organization Identifier: The prefix used to create the Bundle Identifier. It is customary to use the domain inversions like "com.nate.blog"

-Bundle Identifier: A unique identifier for all apps worldwide. It is customary to use a combination of Organization Identifier and ProductName.

Input all blank, and click "Next".

There is nothing to modify on this screen.
Next, we'll create a developer account and then edit it when we actually create the sticker app.
Now, we'll begin with the process of creating a sticker app.

In the next post, I'll take a look at my real developer account screen and work on it in order.

Let's Setup Xcode

1. Go to AppStore and search for Xcode. Click GET and INSTALL it.

2. Xcode will start to download. The installation will start automatically after download completed.

3. Run Xcode.

4. Choice “Create a new Xcode project”.

5. Choice “Sticker Pack Application” to make a sticker app.


Next time i’will posting how to first setting Xcode.

2018-10-12

Things to prepare first, Mac or MacBook for Xode 10

Prepare to make a sticker app. Mac or MacBook for Xode 10.

- Many people say that in order to create an app you must first get a developer account. However, it's important to have what you need to develop your app before you can get paid for your developer account.

-If you do not have a Mac or MacBook, you can not create an iOS app.

- You must use Xcode to create an iOS app. So is the sticker app.

-Xcode is available for Mac and MacBook. Of course, it is also possible to install a Mac OS using a virtual machine on a window PC, but I do not recommend it.

- Obtain a Mac capable of running Xcode10 currently in use.

- I am using MacBook Air as pre-owned.

-Xcode 10 requires a Mac running macOS 10.13.6 (High Sierra) or later.

-High Sierra demands